In a previous blogpost a setup of Distributed Replicated Block Device (DRDB) using local computers was described. This blog post is about DRBD on Oracle Cloud Infrastructure OCI.
Two deployments are described here:
- Active/passive, with a Python application and MySQL database underneath, which can switchover / failover to another node. The setup may be quite safe as it protects against split brain by allowing only one node to be primary and mounted. The other node is just being replicated to but cannot be mounted, and therefore no writes are possible.. A more complex setup with a quorum disk could be found here.
- Active/active, with two mounted read/write primaries, using Oracle Clustered File System 2 (OCFS2), and again a Python script that demonstrates how to access a file system from two nodes. This setup described is basic, and relies on OCFS-2 for locking. The risk for split brain is much larger and should be mitigated with proper node fencing when used in a production setting.
Technology stack
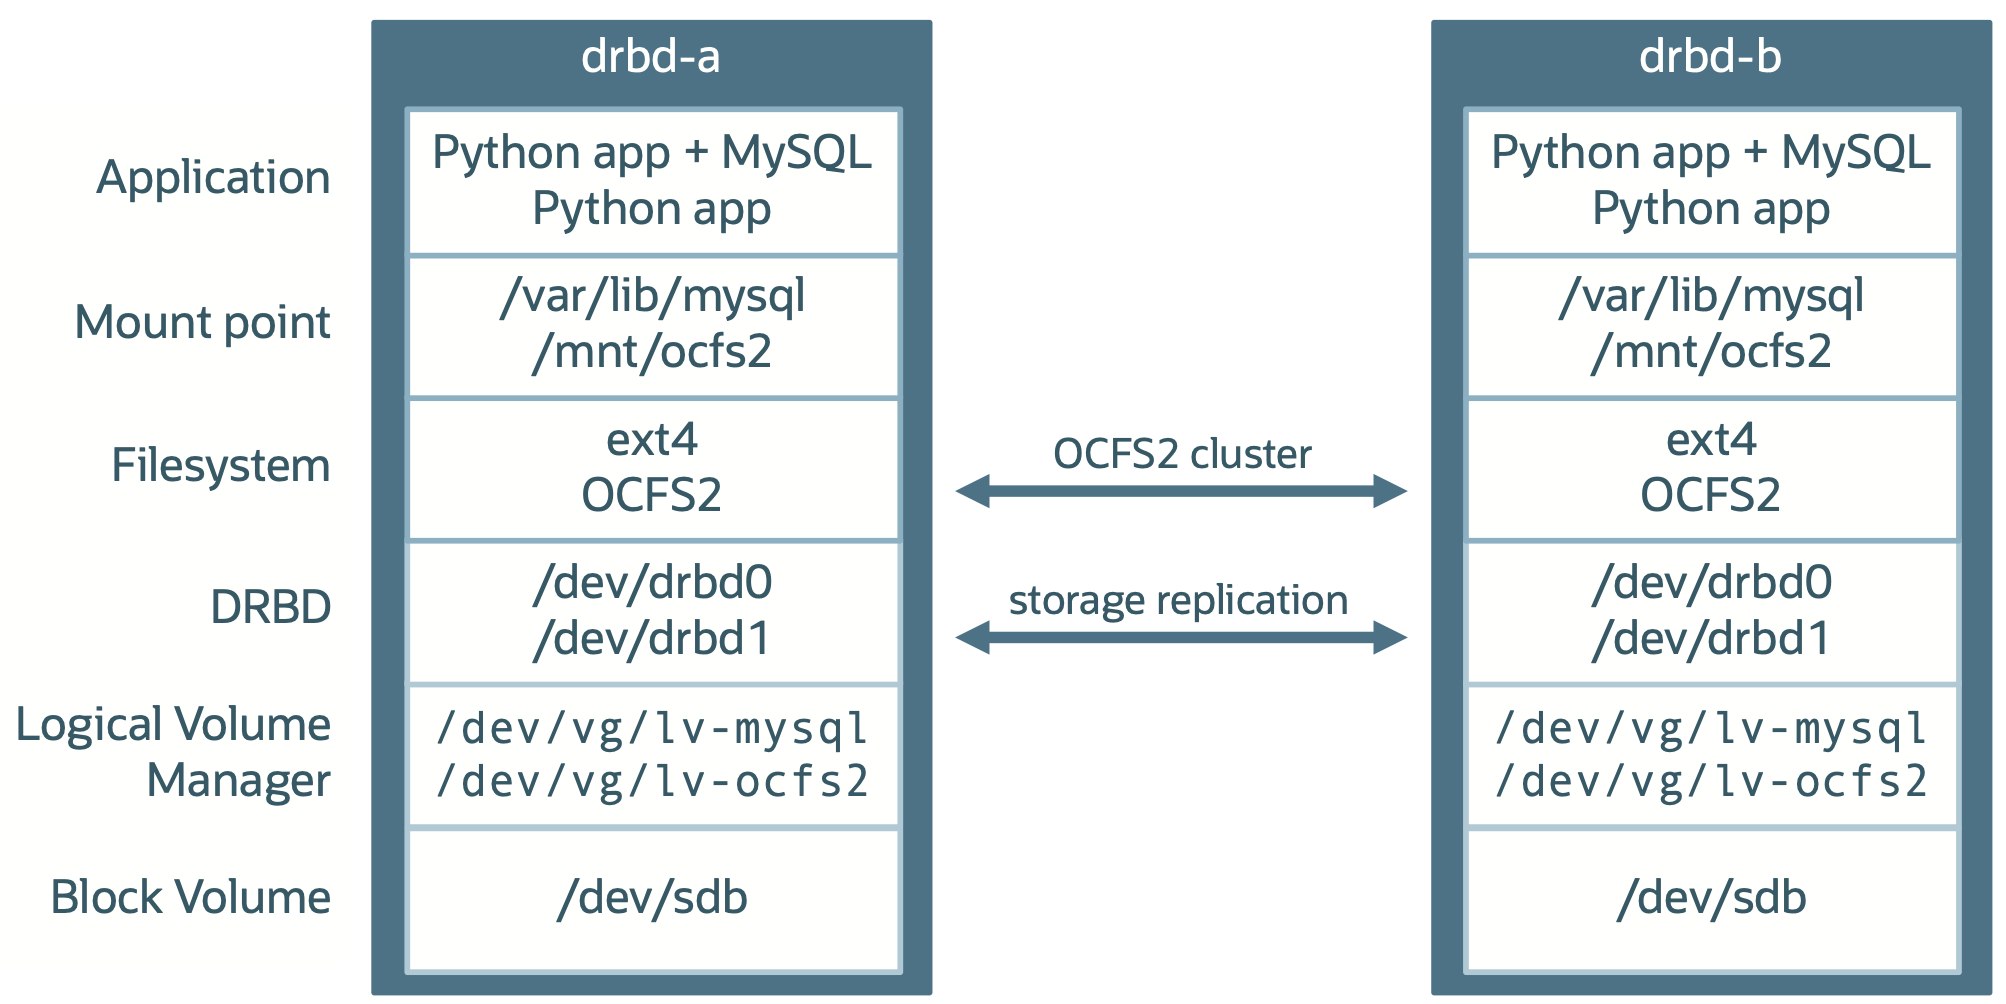
The DRBD storage replication devices will be set up on secondary block volumes, attached to two different compute nodes, deployed in two availability domains. These block volumes will show up as extra block devices in Linux, here shown as /dev/sdb. Note that device names are not persistant over reboots; a next time these block devices may shhow up as /dev/sda. Normally UUIDs are used for persistant naming, but this is not supported by DRBD. To get around this, the block devices are partitioned with Linux' Logical Volume Manager (LVM), and then formatted with DRBD:
- one half for active/passive with the ext4 file system and MySQL, to be mounted on /var/lib/mysql
- the other half for active/active with OCFS2, to be mounted on /mnt/ocfs2.
The end result should look like this:
Cloud infrastructure
The cloud infrastructure used looks like this:
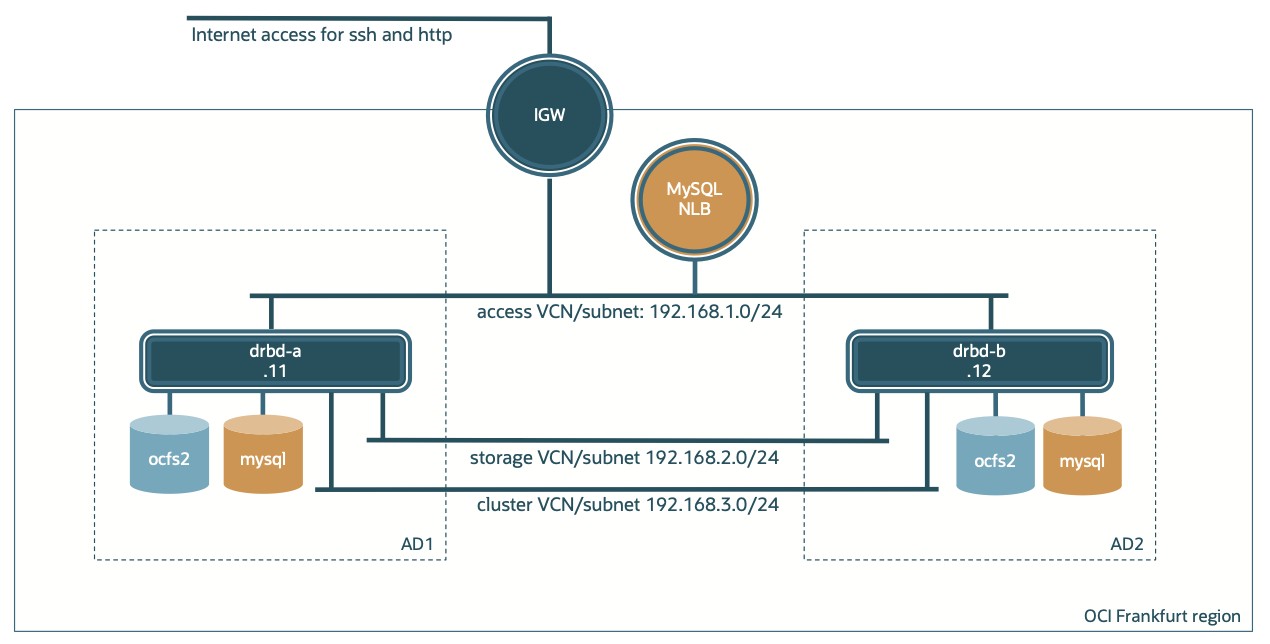
This deployment is in an OCI multi availability domain region, in this case Frankfurt, Germany. Of course, the same could be deployed in a single AD region, or even in a multi-region setup.
There are two nodes that are largely identical:
- One is named drbd-a and is deployed in availability domain 1
- The other is named drbd-b and is deployed in availability domain 2
- Both have an extra disk on which there are two logical volumes: lv-mysql and lv-ocfs2
The setup has three networks:
- A public access network behind an Internet Gateway, and with a Network Load Balancer used for the active/passive setup
- A private storage replication network for DRBD storage replication
- A private cluster network for OCFS2 cluster traffic
Deployment steps
Deploy the network first:
- Deploy access, storage, and cluster VCNs and subnets; the subnets are just one to one mapped to the VCNs
- Create IGW, routing rules and security lists: allow all traffic on the isolated storage and cluster networks
Because the two nodes are largely identical it is convenient to fully prepare the first node, and then backup and restore the boot disk and the extra attached block volume to create the second node.
This configuration is using the OCI default Oracle Linux distro. This distro has good support for OCI specifics.
Redhat removed DRBD from the RHEL repos since version 8, and Oracle Linux followed that. It is therefore neccessary to use an addtional repository, e.g. the Fedora EPEL repo. This also means that DRBD is not supported by Oracle in Oracle Linux nor by Redhat in RHEL. Other distros support DRBD well, e.g Suse, Ubuntu, Gentoo Linux, Alpine Linux, and Fedora.
-
Deploy compute drbd-a with the following specifications and according to the network diagram:
- Oracle Linux 9, E5-Flex shape, 4 OCPUs, 48GB memory
- Extra block volume 100GB, 20 VPU/GB, paravirtualized
- Extra VNICs for the storage and cluster network
-
Enable and start the added VNICs by starting and enabling the ocid service:
# systemctl enable --now ocidThe ocid service provides specific OCI functions. In this case it is used to configure the IP addresses for the second and third network interface in Linux.
-
Disable and stop the SELinux and firewall:
# grubby --update-kernel ALL --args selinux=0
# systemctl disable --now firewalld
This is just to make things easy; in a real setup firewalling and SELinux features might be needed.
-
Enable Fedora's EPEL repo, and install the DRBD package from it:
# dnf install https://dl.fedoraproject.org/pub/epel/epel-release-latest-9.noarch.rpm # dnf install drbd-9.28.0 -
Prepare the block storage with LVM. Create a physical volume for block device /dev/sdb, a volume group vg, and the two logical volumes lv-mysql and lv-ocfs2:
# pvcreate /dev/sdb
# vgcreate vg /dev/sdb
# lvcreate -l 50%FREE -n lv-mysql vg
# lvcreate -l 50%FREE -n lv-ocfs2 vg
DRBD configuration
DRDB has a generic configuration file /etc/drbd.d/global_common.conf, and configuration files per DRBD resource, in this case /etc/drbd.d/mysql.res, and /etc/drbd.d/ocfs2.res.
/etc/drbd.d/global_common.conf:
global {
      usage-count no;
    }
    common {
      net {
        protocol C;
    }
- Usage-count no means no deployment information to Linbit.
- Protocol C means synchronous writes.
/etc/drbd.d/mysql.res:
resource mysql {
    device /dev/drbd0;
    disk /dev/vg/lv-mysql;
    meta-disk internal;
    on drbd-a {
        address 192.168.2.11:8000;
    }
    on drbd-b {
        address 192.168.2.12:8000;
    }
}
- Device is the name under which the DRBD resource will become available: /dev/drbd0
- Disk is the underlying block device, the LVM partition /dev/vg/lv-mysql
- On node address is the ip address:port that DRBD uses for storage replication for this device, for this resource. The node must be equal to the hostname.
This manner of configuration allows for the resource file to be the same for the different nodes.
/etc/drbd.d/ocfs2.res:
resource ocfs2 {
    net {
        allow-two-primaries yes;
        verify-alg crc32c;
    }
    device /dev/drbd1;
    disk /dev/vg/lv-ocfs2;
    meta-disk internal;
    on drbd-a {
        address 192.168.2.11:8001;
    }
    on drbd-b {
        address 192.168.2.12:8001;
    }
}
- allow-two-primaries needs to be specified for active/active configurations.
Disk preparation MySQL for the active/passive usecase
-
DRBD formatting is done by placing the DRBD metadata on it:
# drbdadm create-md mysql -
Start the DRBD service and make primary:
# drbdadm up mysql # drbdadm primary --force mysql -
Format the mysql drbd device /dev/drbd0 and mount it at the default location for MySQL data files /var/lib/mysql:
# mkfs.ext4 /dev/drbd0 # mkdir /var/lib/mysql # echo /dev/drbd0 /var/lib/mysql ext4 _netdev,noatime 0 0 >> /etc/fstab # mount /var/lib/mysql -
Install MySQL server and client software
# dnf install mysql-server python3-mysqlclient
Disk preparation OCFS2 for the active/active usecase
-
DRBD metadata initialization:
# drbdadm create-md ocfs2 -
Start the DRBD service and make primary:
# drbdadm up ocfs2 # drbdadm primary --force ocfs2 -
Install OCFS2 tooling
# dnf install ocfs2-tools -
Create a OCFS2 cluster named ocfs2drbd:
# o2cb add-cluster ocfs2drdb # o2cb add-node ocfs2drdb drbd-a --ip 192.168.3.11 # o2cb add-node ocfs2drdb drbd-b --ip 192.168.3.12 # o2cb add-heartbeat ocfs2drdb /dev/drbd1 # /sbin/o2cb.init configure # systemctl enable --now o2cb # systemctl enable --now ocfs2 -
Format the ocfs2 drbd device, and mount it:
# mkfs.ocfs2 /dev/drbd1
# mkdir /mnt/ocfs2
# echo /dev/drbd1 /mnt/ocfs2 ocfs2 _netdev,noatime 0 0 >> /etc/fstab
# mount /mnt/ocfs2
Deploy the second node, drbd-b
Rather then repeat all the steps above for the second node it is easier to replicate node drbd-a to drbd-b.
- Create backups of drbd-a’s boot volume and the drbd block volume
- Restore boot volume and block volume in AD2
- Create an instance drbd-b in AD2 from the boot volume with the same specs as drbd-a
- Post deployment steps:
- Verify fstab, and add mount points if needed
- Verify assignment of IP addresses to secondary VNICs
-
Bring up drbd resources:
# drbdadm up all -
Make the ocfs2 resource on drbd-b also primary, and verify the status
# drbdadm primary ocfs2 # drbdadm status all # cat /proc/drbd -
Bring the ocfs2 cluster up and verify the status:
# o2cb.init online ocfs2drdb # o2cb.init status -
Once the ocfs2 drdb resource is up to date and the ocfs2 cluster is online it can be mounted:
# mount /mnt/ocfs2
Active/passive testcase
For the Active/Passive testcase a Python webserver script is available on gitlab. This script has a basic Python webserver serving at port 8080 and should be running on both nodes. The testcase it supports is incrementing a counter called pageviews in a MySQL database; after a switchover (or failover), the counter should continue to be incremented. The page refreshes every five seconds, thus incrementing the page counter again and again.
For this to work a MySQL database has to be created, this can be done with the create_counter_db.py script.
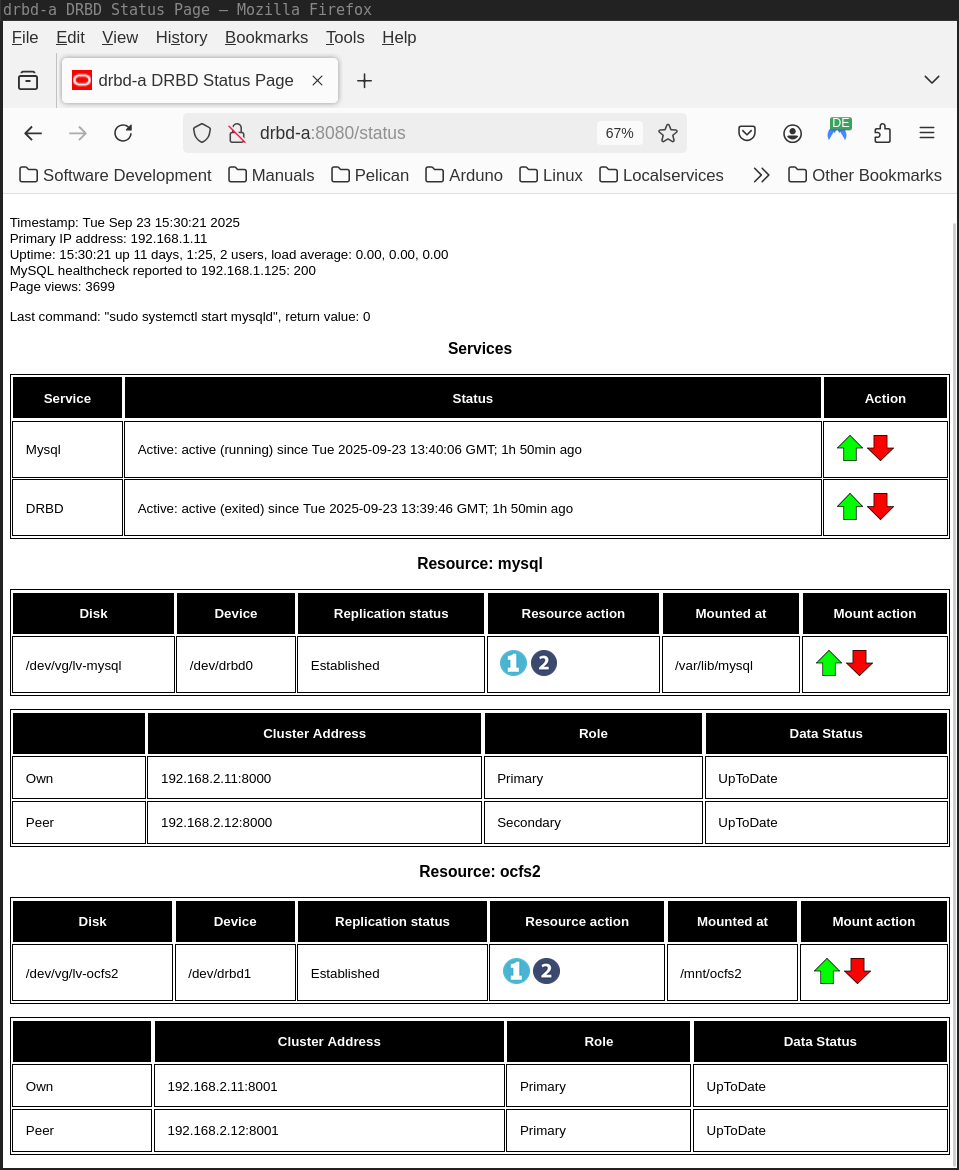
The webserver script also has functionality to:
- show the status of the system services and the DRBD resources
- start/stop the DRBD and MySQL services
- make a DRBD resource primary or secondary and to mount / unmount it
Of course incrementing this counter only works when the prereqs are met:
- DRBD service is up
- DRBD resource mysql is primary and mounted
- MySQL service is up
This can be manupulated from the commandline, or on the web-page provided by the Python script:
A switchover from node drbd-a to node drbd-b can be done by:
- on node drbd-a:
- taking the MySQL service down
- unmounting the mysql DRBD resource and making it secondary
- on node drdb-b:
- making the mysql DRBD resource primary and mounting it
- bringing the MySQL service up
The loadbalancer can be configured to automatically route the service to the active node. The loadbalancer performs healthchecks on the webserver by calling the webserver on /status_mysql. The webserver only reports healthy (with HTTP status 200) when all the prereqs are met.
Active/active testcase
The active/active testcase is just showing that it is possible to write from two nodes simultanuously to the same file system without corrupting it. This requires a clustered file system with a distributed lock manager, which is provided by OCFS2. The application writing needs to use this by locking the file that is being written to.
This Python script can demo this. It loops over the following steps:
- tries to open an output file for append
- tries to lock this file, and then printing an "L" when it fails
- truncates this file if it is too large, printing a "T"
- writes the hostname into that file, printing a "."
- pauses for a random amount of time
- releases the lock
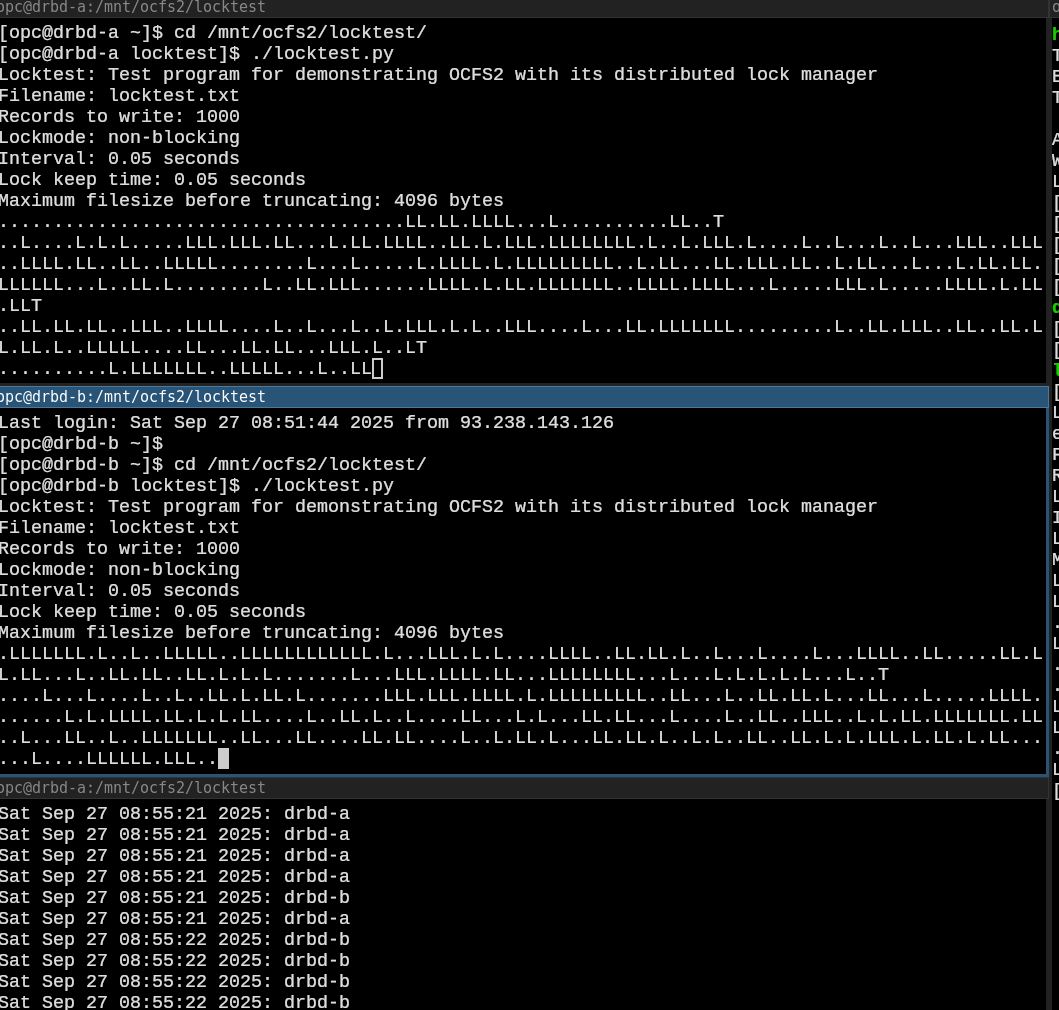
By tailing the output file it becomes clear that both nodes write to the same file. The picture below shows three terminal windows:
- on top one running locktest.py on node drbd-a
- in the middle one running the same on node drbd-b
- the lower one is tailing the output file on drbd-a, but could have been on drbd-b too.
Final thoughts
- Adding a third or n-th node could be really useful, e.g. with three nodes in all three availability domains of OCI. That way there could always be local I/O to a file system on a distributed filesystem. True high availability would require more nodes; if one node fails, the there should be more than one left. There is an option for stacking DRBD devices, but that seems a kludge.
- Some documentation describe options that are not available, at least not in free versions of DRBD, e.g. handlers. Possibly these options are available in paid versions of DRBD.